PyCharm Autocomplete Setup for MotionBuilder Scripting
PyCharm, a popular Python IDE, can greatly enhance your scripting experience in MotionBuilder. This tutorial will guide you through the process of configuring PyCharm for MotionBuilder scripting, enabling autocompletion feature to streamline your development workflow.
Prerequisites
- PyCharm IDE
- MotionBuilder installed on your system
Step by step instructions
Step 1: Creating a Symbolic Link
The first step is to create a symbolic link from the MotionBuilder installation folder to a directory recognized by PyCharm. This allows PyCharm to access MotionBuilder’s Python modules.A symbolic link, also known as a symlink or soft link, is a reference to a file or directory that acts as a pointer to another file or directory.
- Open a Command Prompt with administrative privileges.
- Navigate to the desired directory for the symbolic link.
- Execute the command to create the link.
mklink "C:\Program Files\Autodesk\MotionBuilder<version>\bin\x64\mobupy.exe" "C:\Program Files\Autodesk\MotionBuilder<version>\bin\x64\python.exe"
The command provided above creates a symbolic link for the file mobupy.exe located in C:\Program Files\Autodesk\MotionBuilder
\bin\x64 and linking it to C:\Program Files\Autodesk\MotionBuilder\bin\x64\python.exe .
By creating this symbolic link, you are essentially making it possible to access mobupy.exe through the link python.exe
Please note that
<version>in the path C:\Program Files\Autodesk\MotionBuilder\bin\x64 should be replaced with the actual version number of Autodesk MotionBuilder installed on your system for the command to work correctly.
Step 2:Configuring PyCharm
Let’s configure PyCharm to recognize the MotionBuilder Python modules and enable autocompletion.
- Launch PyCharm and open your MotionBuilder scripting project or create a new one.
- Navigate to File > Settings (Windows/Linux) to open the Settings/Preferences dialog.
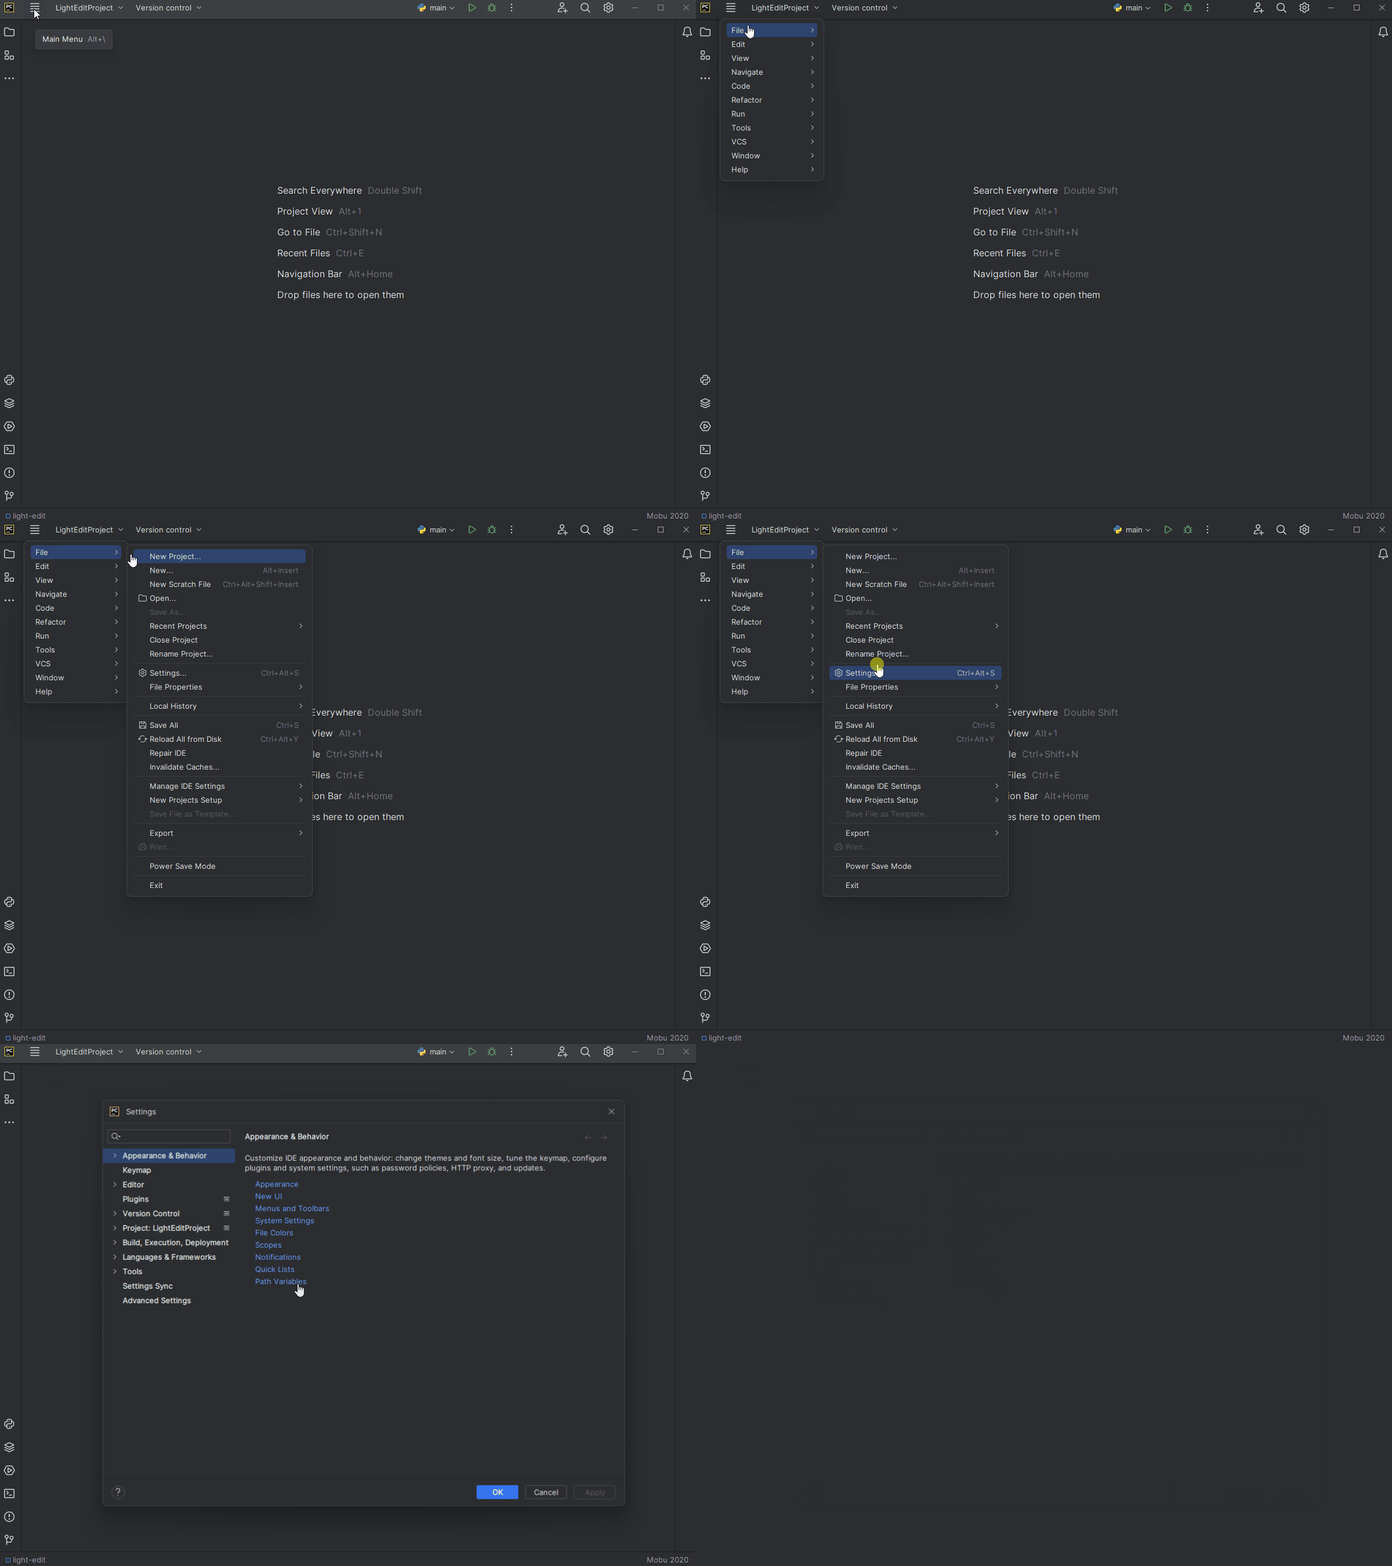
step-1-2
- In the left-hand pane, go to Project: YourProjectName > Project Interpreter.
- Click the “Add Interpreter” button located at the top-left corner and select “Add Local Interpreter…”.
- In the left-hand pane, choose “System Interpreter”.
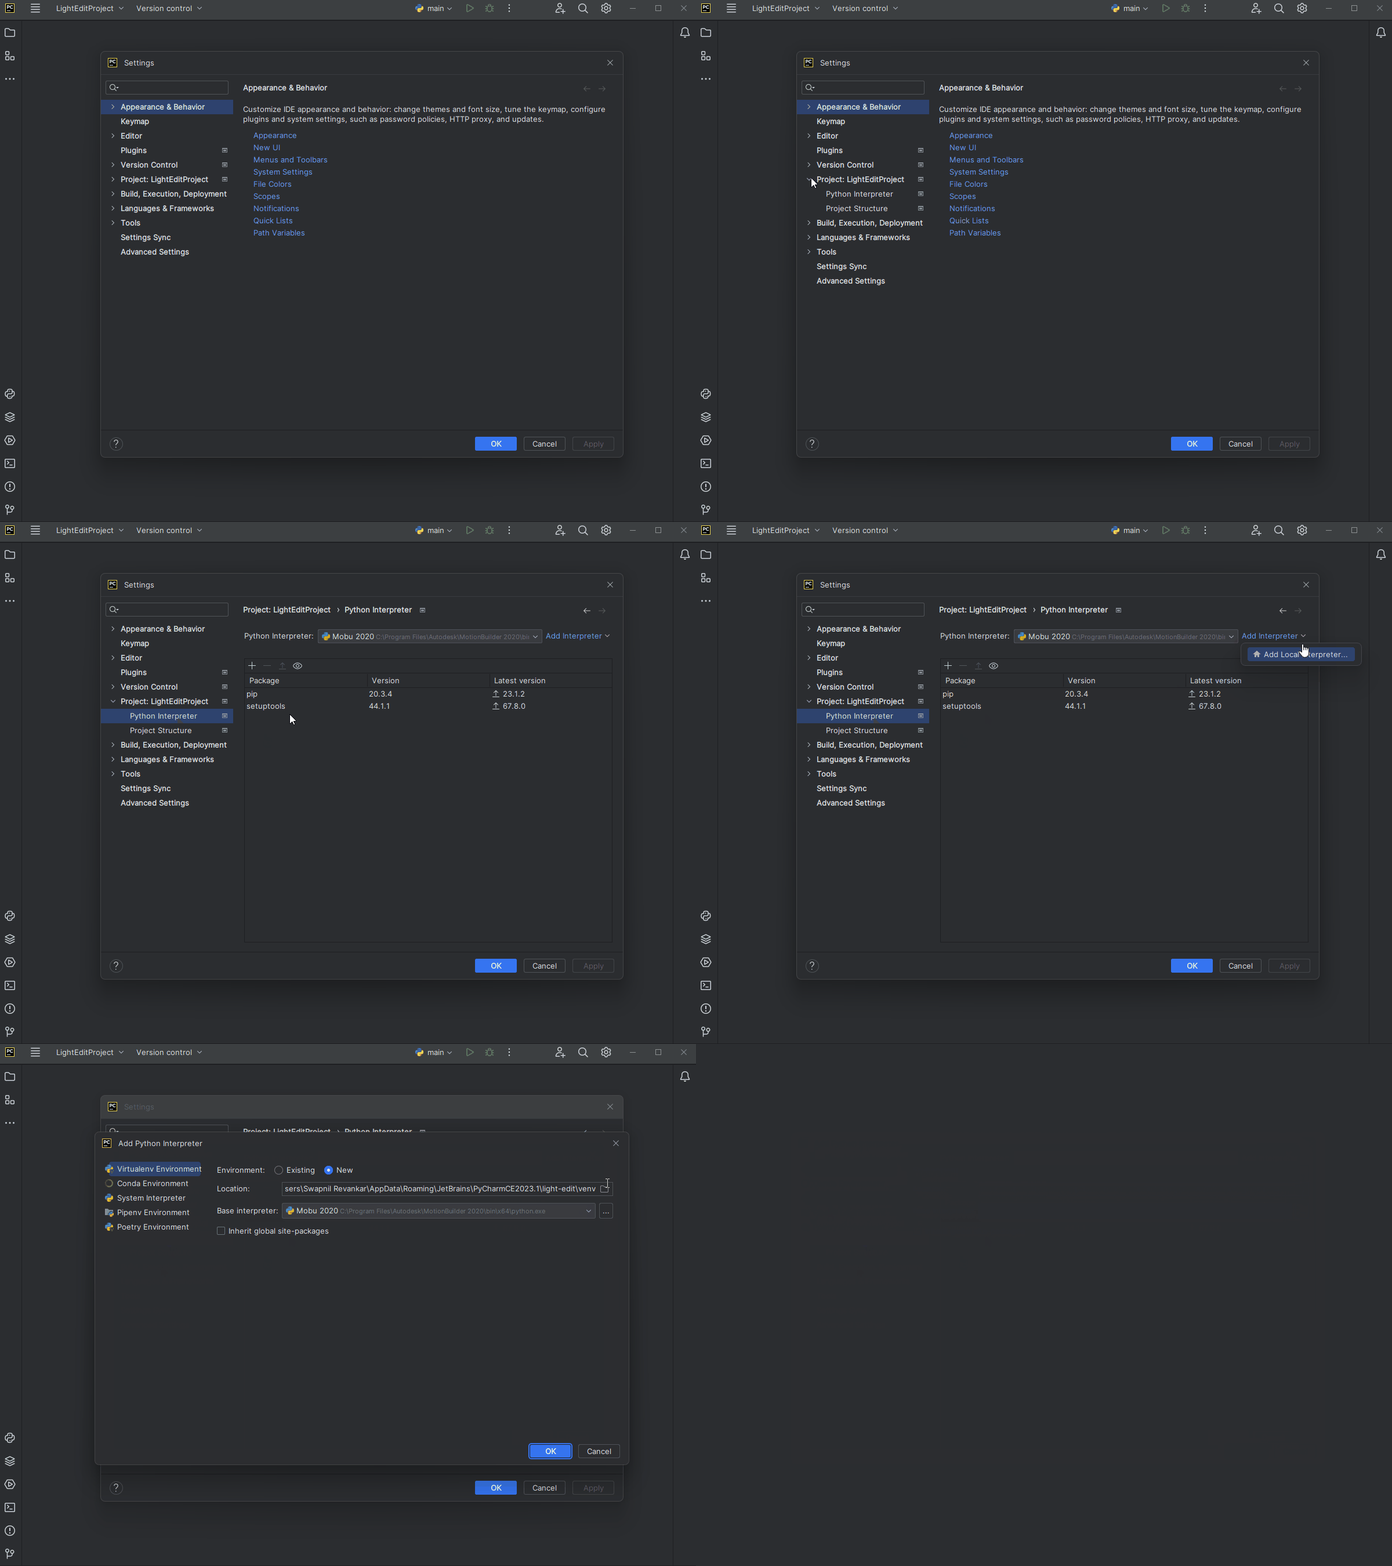
step-3-4-5
- Click the “…” button next to the Interpreter field.
- In the Interpreter Paths dialog, click the “+” button to add a new path.
- Locate and select the symbolic link directory created in Step 1 (e.g., “C:\Program Files\Autodesk\MotionBuilder
\bin\x64”).
- Click “OK” to save the changes.
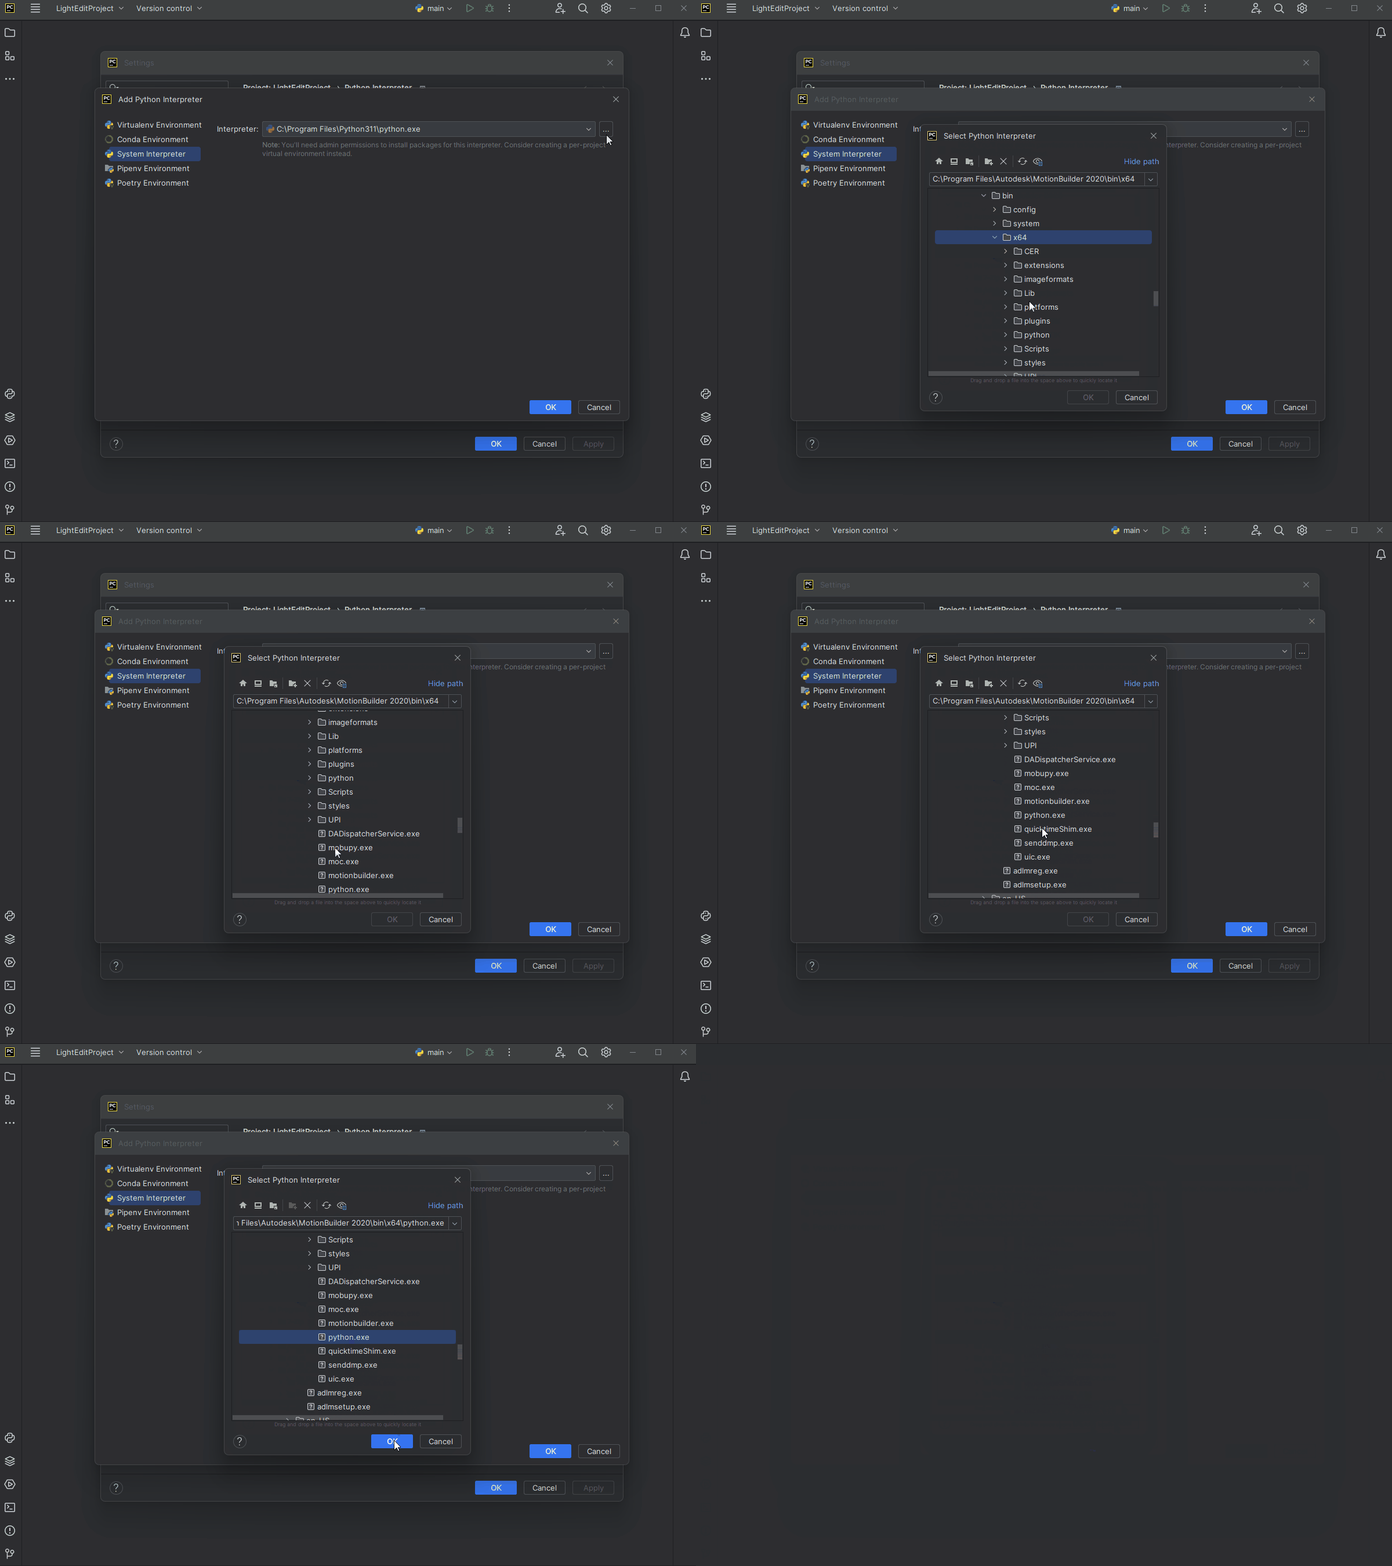
step-7-8-9-10
- Back in the Project Interpreter dialog, select Show All… from the dropdown. Then, locate the newly added interpreter and click on the rename icon next to it. Give the interpreter a more meaningful name, such as “Mobu
,” to easily identify it in the future.
- Click “OK” to apply the changes.
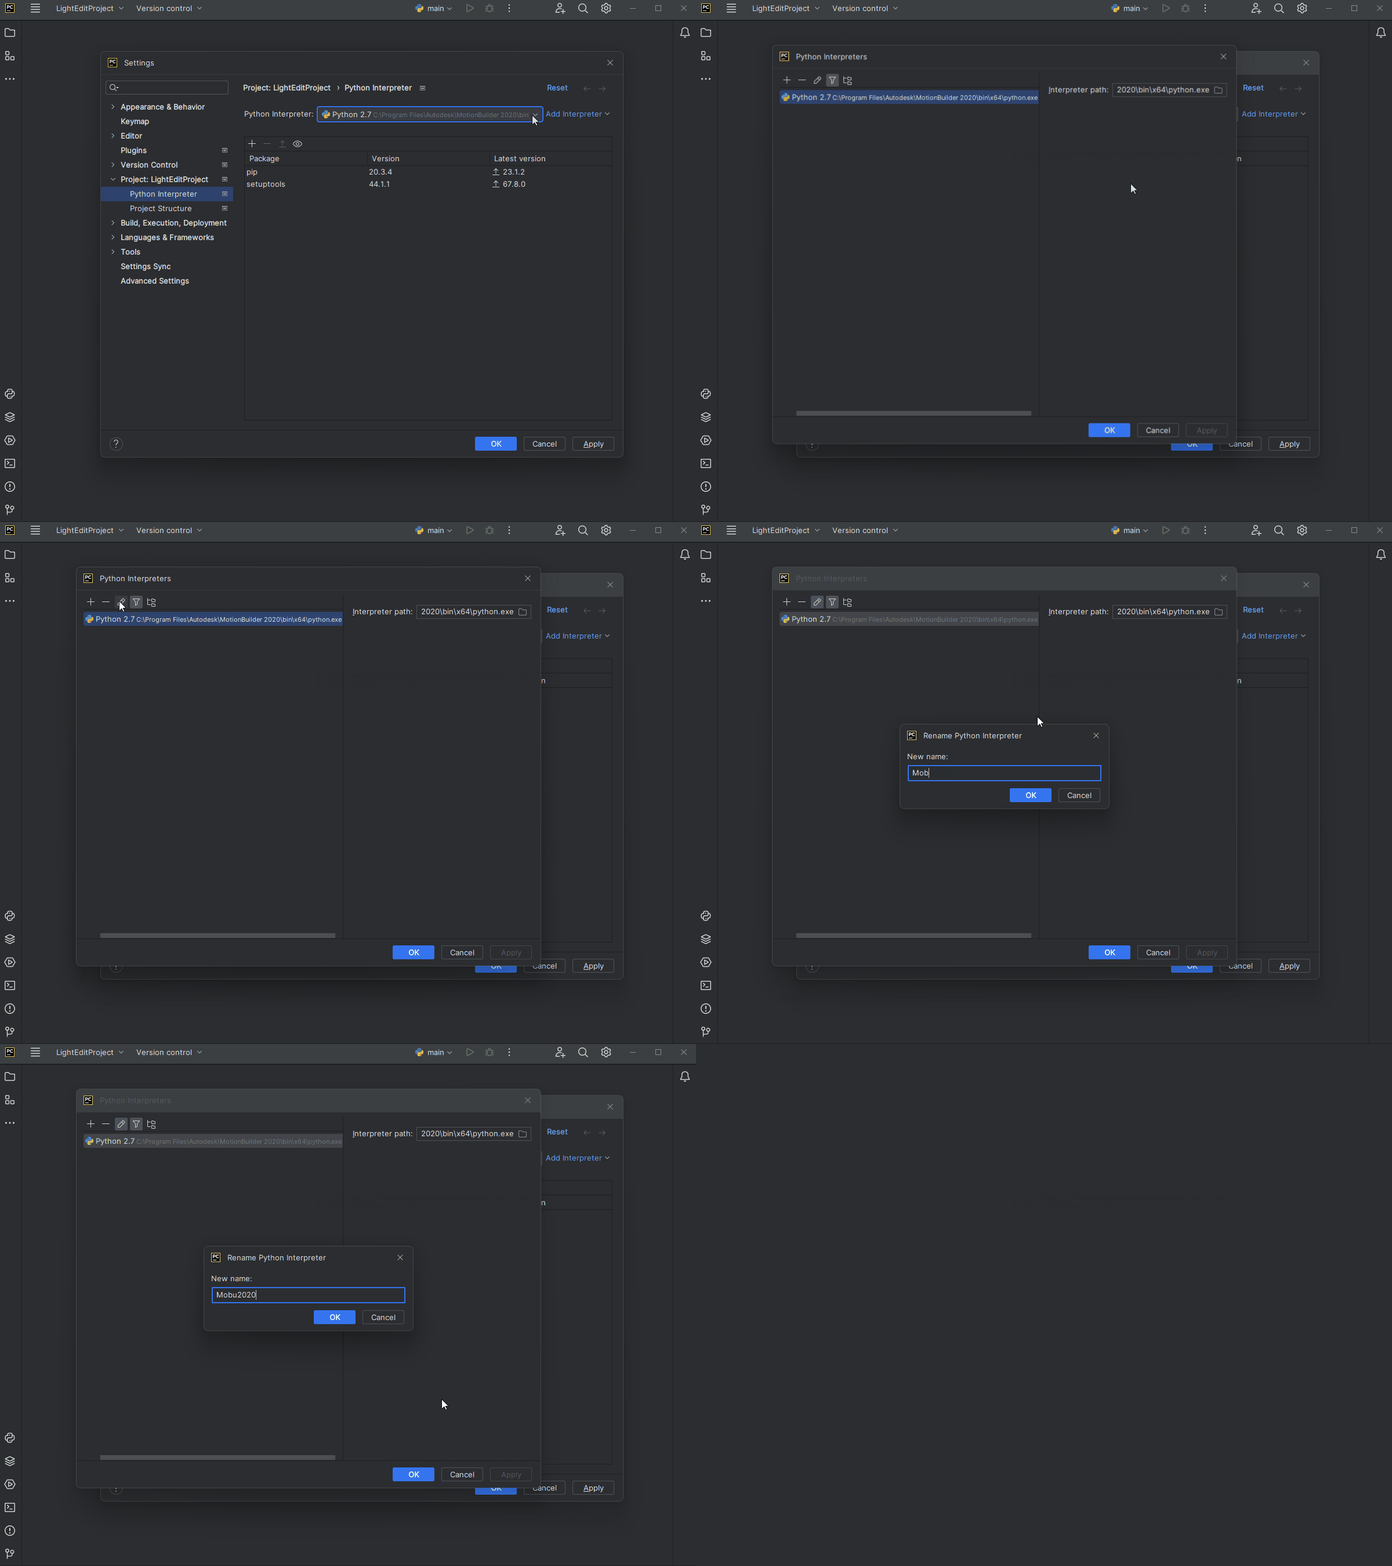
step-11-12
- Click the show paths icon in the Project Interpreter dialog.
- Remove the MotionBuilder site-packages path to avoid any clashes between the stub files and ensure that PyCharm’s autocompletion and code analysis features function correctly with accurate information about the available modules and functions.
- Click OK to confirm the changes and proceed, then close all the settings windows to finalize the configuration.
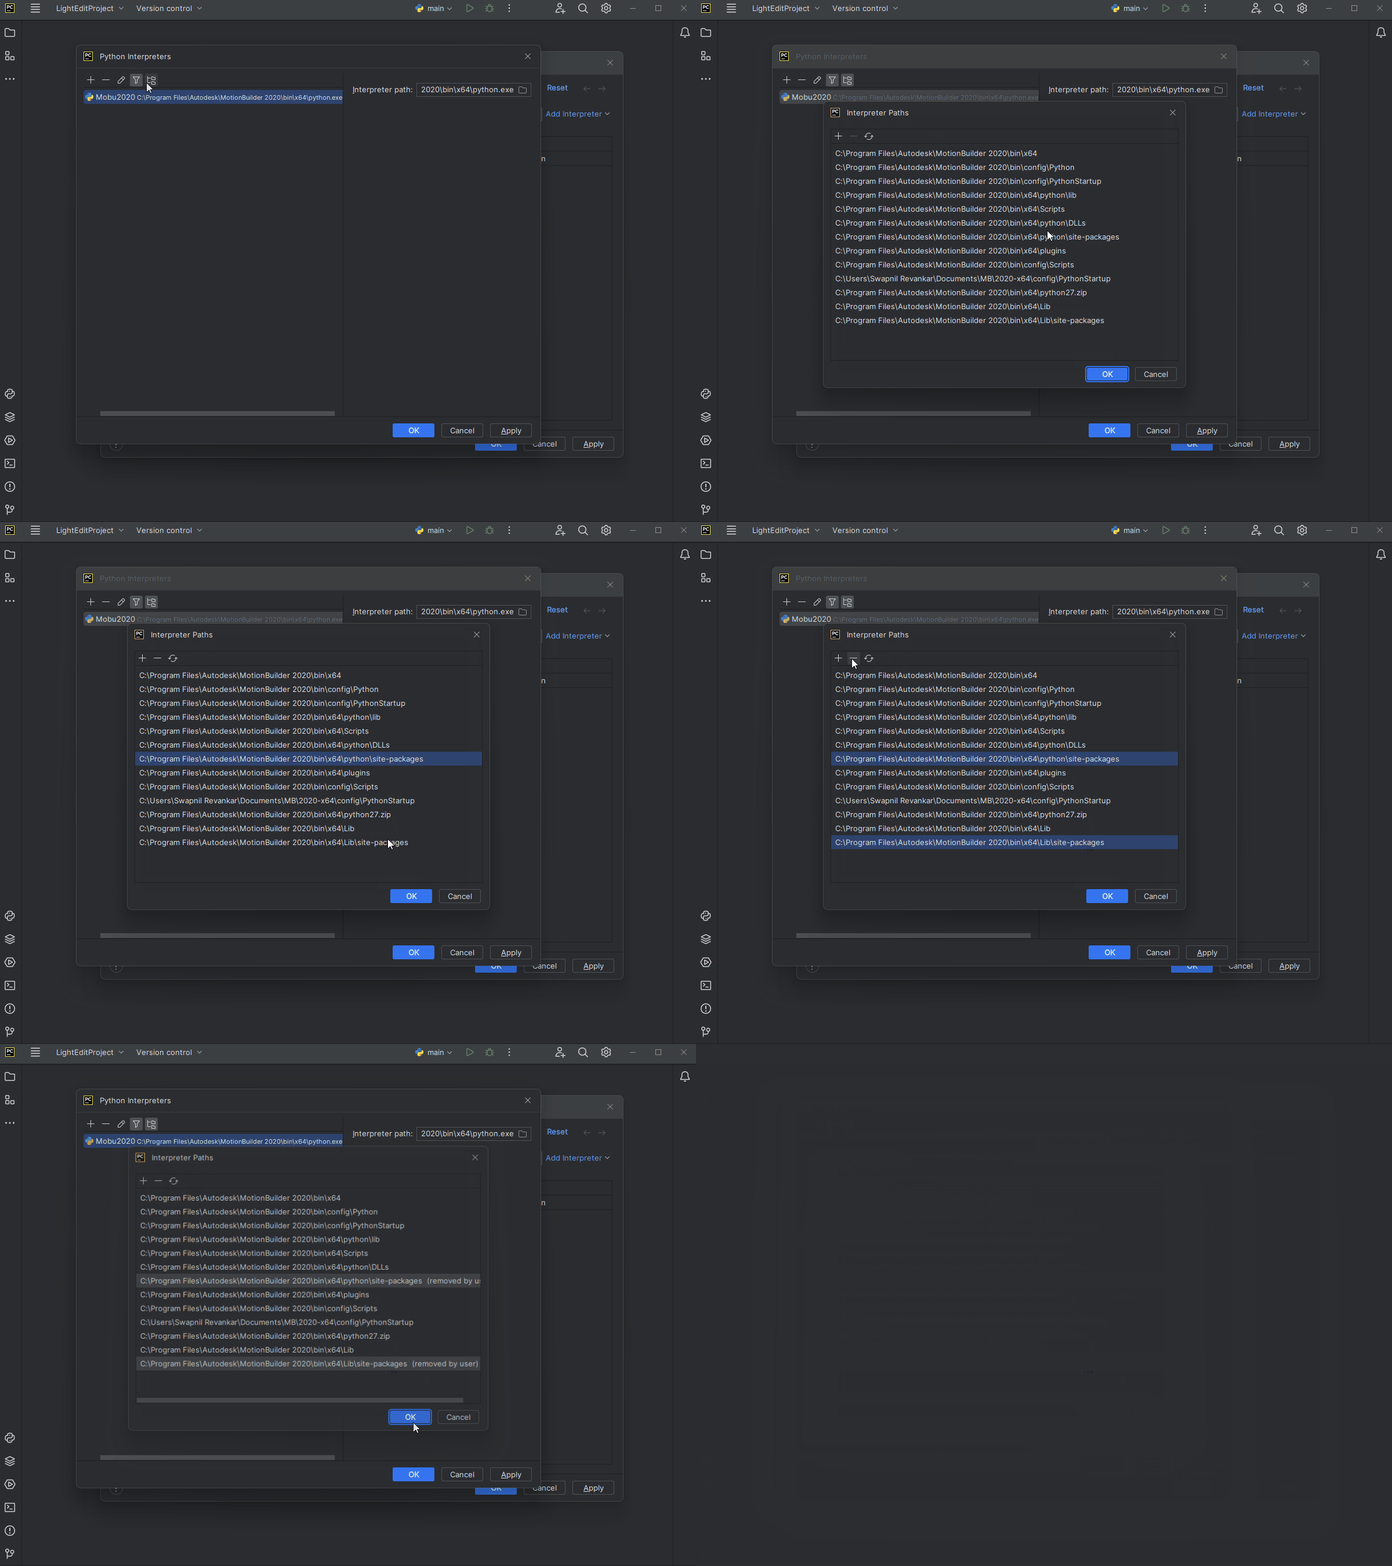
step-13-14-15
Step 3:Testing the Setup
Let’s verify that the PyCharm autocomplete setup works correctly:
- Write or open an existing Python script within your MotionBuilder project.
- Import pyfbsdk. As you type, PyCharm will provide autocompletion suggestions based on available MotionBuilder modules and functions.
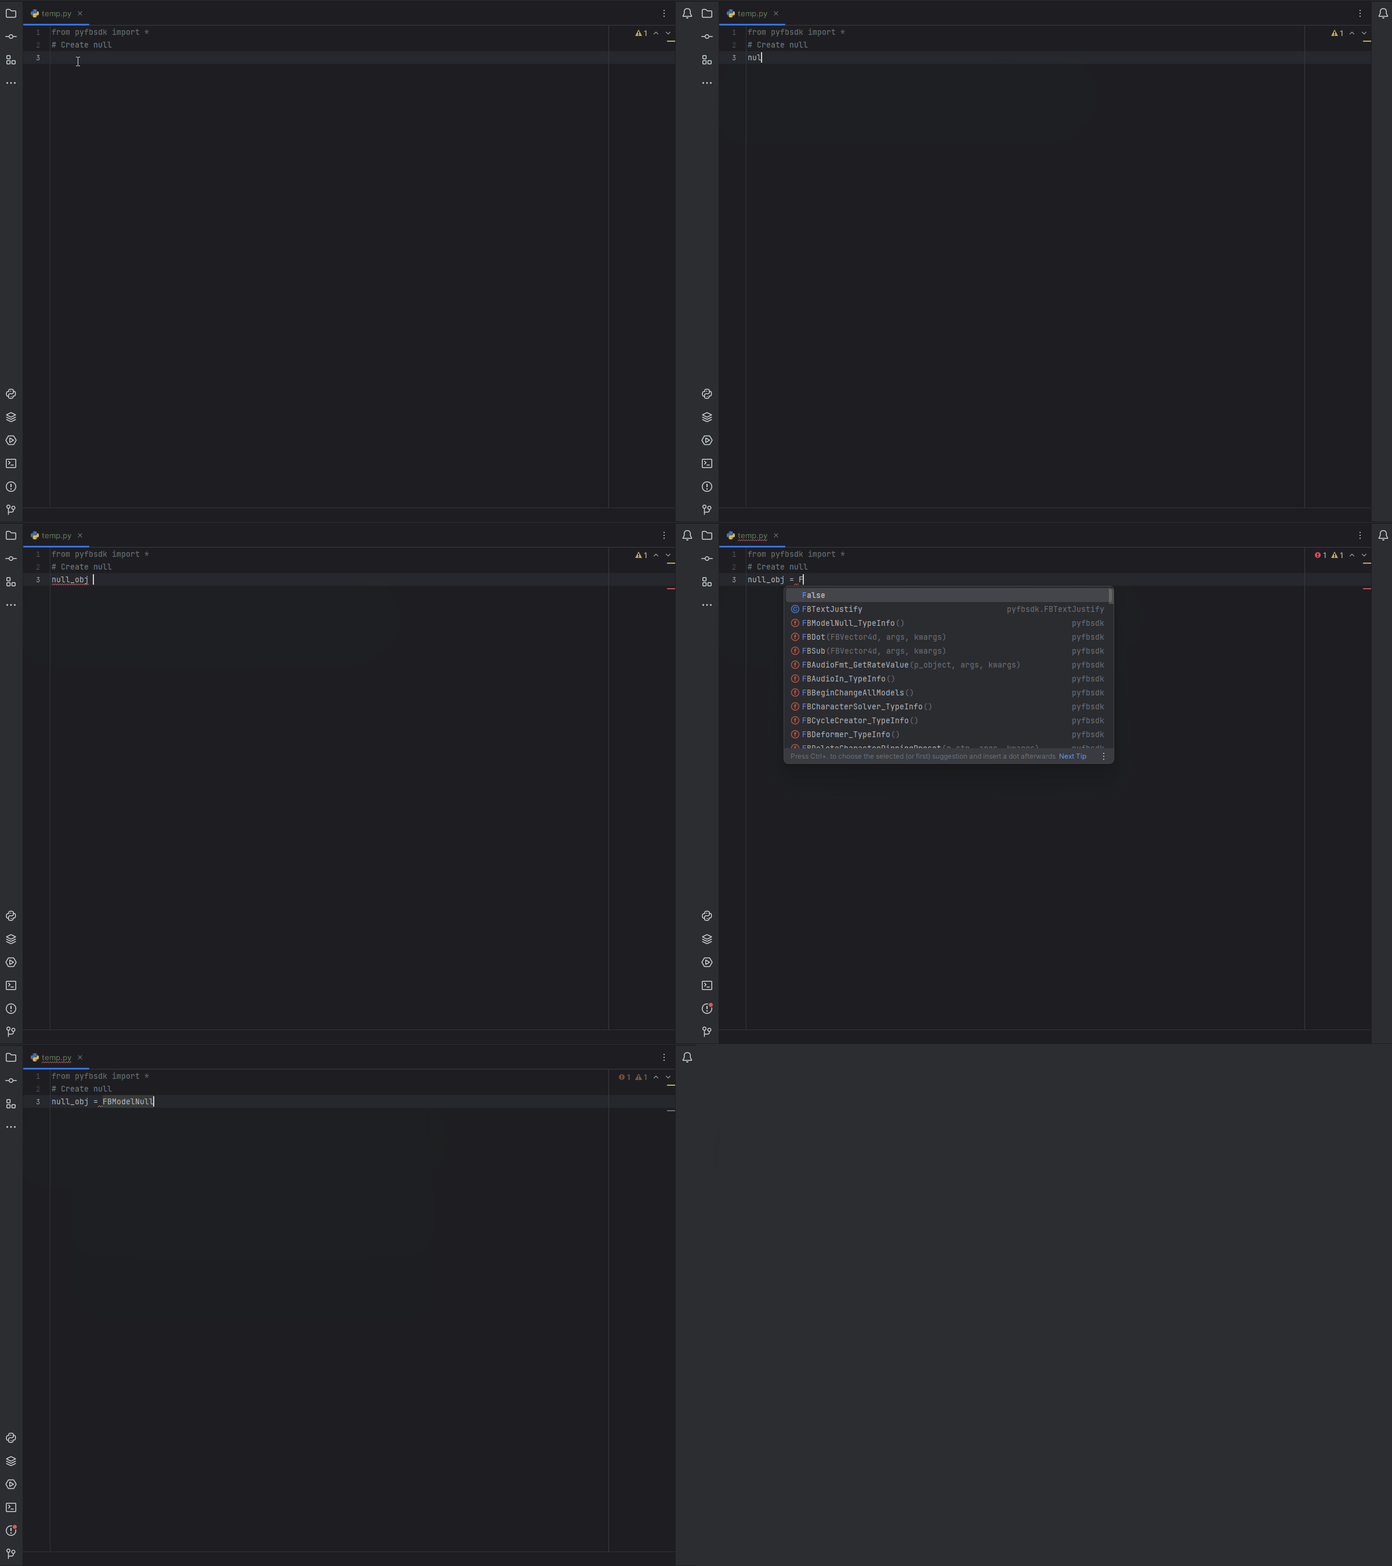
testing
With PyCharm properly configured for MotionBuilder scripting, you can take advantage of autocompletion and other beneficial features offered by PyCharm. This will significantly enhance your productivity and streamline your development process, resulting in a more efficient scripting experience in MotionBuilder.